CLICK HERE FOR FREE BLOG LAYOUTS, LINK BUTTONS AND MORE! »

2/26/09

How To:
I had someone ask me how I get each section of a puff braid to "stand out"
So I did some messing around and this is what I came up with...

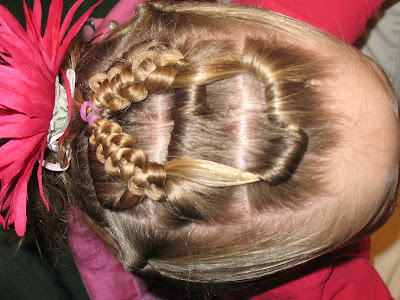
On the right side of the pictures I held a sectioned strand straight up and fastened the elastic right in the center of that section, then continued adding sections...each section was held straight up, I added each section and secured elastics in the "center" of each section...


On the left side of the picture I fastened the elastic at the "back" of each section and "didn't" hold each section straight up. Instead I held it in the direction I wanted it to lay. Notice the appearance of each is hugely different depending on where you position your elastic! Cool eh?

The left side seems to lay a little flatter. It looks a little cleaner and neater to me, while the right side is puffier and seems is a little less "snug" to the head.
Same view, a little different perspective

I keep each of my sections pulled tight.
This is what makes each section "stand out."

To tighten a loose section:
Seperate the strand into two pieces (top/bottom) the top piece should be the hair from the strand you just connected into the next section. Bottom piece should be the section you just added to.

Hold the top piece tightly while pulling down and back on the bottom piece. This will pull the hair in the section taut and make each section "stand out."

2/25/09

Connecting Puff Braid Meets a Nest of Worms


Make your part down the middle. I'm a little silly about the part straight down the middle so I add the little piece from the side. Just a personal preference.

Take a small section on either side and fasten with an elastic. Continue going back in small sections connecting them as you go. Repeat evenly on opposite side. Bring the strands from both sides and connect with an elastic. Take small pieces of hair from this strand and twist, twist, twist, untill your strand of hair curls up on itself like these worms & secure with an elastic. Have your dd hold twisted strands otherwise they will untwist. Continue making worms until all pieces have been twisted. Use bobby pins to secure ends of worms to the section of hair the worms were made from. I pin the part with the elastic so the hair wont slip out of the bobby pin. I left just enough hair on the ends to stick out & make little wispys.

I added a corker bow to give it a little more umph...It would also work with a flower, a bow, or without. However you like.


2/24/09

Funky Diva Do & How To:

I have NO idea what to call this knot, but was asked to explain how it is made...This is how I do it!

WARNING...this knot is not MY knot!
I HAVE seen this done on other hair blogs, like this fun blog and I am SURE many others have done it before too.

I apologize for taking forever to get this done...My dd was sick and throwing up... "every" time she starts throwing up her little body will NOT quit until she goes in to the clinic for I.V.'s and phenergan ... so, yet again we took her in as a live pin cushion... poor kid! Any way she is feeling much better now and is again willing to let me play with her hair...

Start by sectioning off your first piece of hair.


Then section that part into two pieces.


Take those two pieces and cross them just like you would when tying a shoe. It'll look like this...


Now you should have two strands of hair that look like this, and instead of pulling the strands tight right here, you want to take the left strand and wrap it up through the hole you have created. Then take the right strand and loop it over and through again. It should look like this...


Now you pull the strands tight to make this...


For this funky diva do we started by parting the hair down the middle. Take a small section on either side and section it off into your two smaller sections, tie it up, and cinch it tight. We did this 3X on each side. This leaves you with tails in the middle...

With all the tails we did a twist and added the extra tails in as we went toward the back. After getting to the back of each of these knotty rows, we tied it off with an elastic.
We then took the tail from the other side of the knot and made a twist on each end of them then swept them up into a pony tail and finished that off with a messy bun.


I hope this explanation helps...if not, let me know and I will record a clip showing the process.


Now, on to another How To:
Squishy Braids

WARNING: This is not MY braid!
This, I call a squishy braid. I have also seen it called the "rick rack" braid here...

I learned how to do this when my dd was just a toddler without enough hair to even do it on but LOVED it and couldn't wait until she had enough hair to try it.

All you do is a simple three stranded braid making sure you don't braid the hair tightly. You want a loose braid. Practice makes perfect!


Braid down as far down as you can. Then you will pinch together two strands in one hand and the remaining strand with the other hand.

With the fingers pinching the two strands together, slowly start to push/slide the braid upward toward the roots of the hair all the while holding the single strand in place.


After you squish your braid secure it with an elastic band and style!
hint: to eliminate little frizzies use gel of pomade etc before braiding

I hope this explanation worked...If not make sure to comment and I'll try to get a short clip posted!


2/20/09

Hang With Me

Ok ladies, hang with me! I've had a few requests recently and I am definitely going to explain a few of my tricks...I've just had one sick little girl and it is wearing me down...Hopefully I can get back to you and answer some of your questions next week! Have a great weekend... until then... ttfn!

2/9/09

Puff Braid & A Lazy Bun

make your trailing puff braid...at the end, wrap your pony tail around itself and secure it with a bobby pin!


If I had more time on this day, I would have finished it off by curling the ends that are sticking out. It probably would have been a lot cuter!

2/6/09

Curls Anyone?

I'm SO excited about THIS new hair styling product...new to me anyway...I found these curlers through a friend of mine. She used them on her girls, and their curls turned out gorgeous. So of course I wanted to try some! They're called "Curl Formers" and you can go HERE to find them. For as much hair as my dd has, they ended up being pretty expensive for as many as we had to buy... BUT...I must say it was completely worth it! I LOVE them!!!!!

'Curlformers' come in smaller packages of 6, 8, 10 or 12 depending on the size you buy. Or you can also get them in a starter kit. That's not what we did, but I'm thinking now that we may have been better off starting with the kit??...oh well! Live and learn right?


They come in different sizes & lengths...
for varying lengths of hair & depending on how tight you want your curls to end up


You'll use a hook which looks like a giant crochet hook.


Just pinch the end of the "Curlformer' to open it
and feed the hook all the way through.


Now, with the hook facing upwards...

...place the section of hair in the hook...
...pull the hook back through the 'Curlformer'...

...Dry the hair...

('Barbie' makes a great hair model when 'K' has already left for school and I don't have anyone/anything else to demonstrate on)
...remove 'Curlformers'
and you have a perfect curl!

We did this last night after her bath
They stayed in all night

Perfect Curls!!!


All we did this morning is pick through the curls and add a headband! It doesn't get any easier!
(X-cuse the mess in the background, we're painting)!

You can actually perm with these curlers too...
I Love the end result...Did I mention that I LOVE it?
Have any of you ever used these? Let me know what you think about these cool things! Is it just me, or are these things the coolest?